How to Create a Continuous OTA Job
The Continuous OTAOver-the-Air feature provides the capability to find and add new devices that match your OTA job's criteria during time frame specified in your job's schedule. No additional user interaction is required if you have a job schedule. While the job is running, the Ayla platform automatically continues to evaluate (every hour) devices in the field that match the criteria specified for your Continuous OTA job. When new devices matching this job criteria come online, the platform identifies those devices as candidates and pushes this OTA upgrade at the specified runtime to those new devices.
Create a Continuous OTA Job as follows:
- On the Jobs page, click the CREATE DEVICE JOB button:

This displays a menu page to select a job type, as shown below:
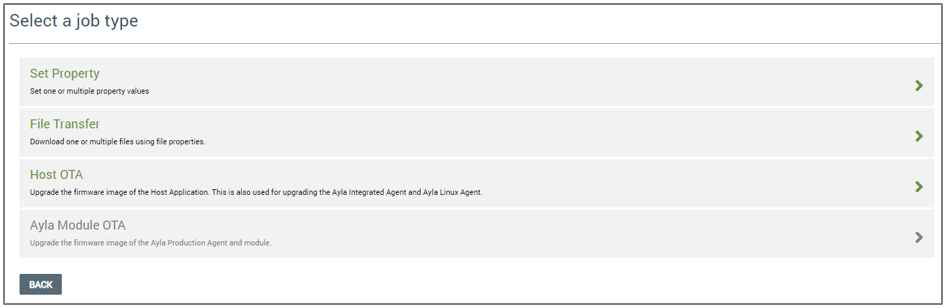
- Click Host OTA to open the Create Host OTA page (example shown below):
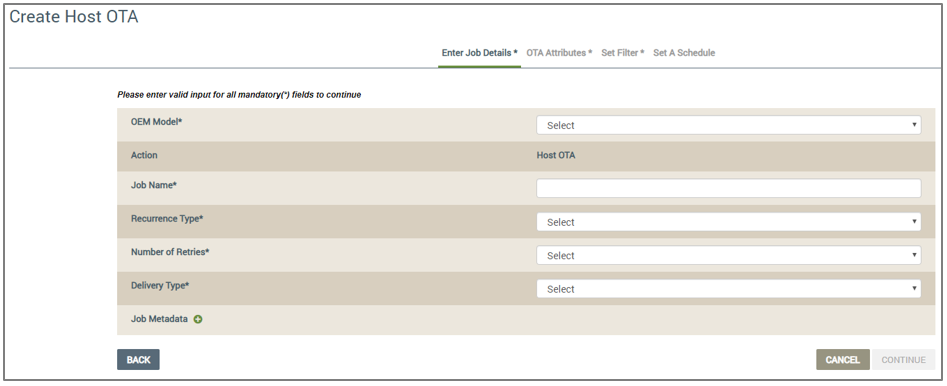
- Complete the fields for your Host OTA Job as follows:
- For OEM Model, select the OEM model of the devices that will be targeted for this job. This list contains the model IDs of the OEM’s host application board, which are extracted from each Ayla template associated with your OEM admin role. Your selection specifies the OEM model of the target devices that will receive the firmware image uploaded for this job.
- For Action, notice that the type of ICC job that you are creating displays (which cannot be edited). In this case, it should be Host OTA.
- For Job Name, enter a name for this ICC job.
- For Recurrence Type, select the Continuous option to specify how often this ICC job must be downloaded to the devices.
The other option is called One Time. This specifies that once the ICC job is activated, the Ayla platform evaluates which devices match the configurations for this ICC job, and then pushes the OTA upgrade to those devices. This evaluation only happens one time upon activating the ICC job.
- For Number of Retries, select the number of times to attempt to download this ICC job if the first attempt is not successful.
- For Delivery Type, select one of the following options to specify how you wish this ICC Job should be executed:
- System Push - When new devices that match the configurations in this ICC job are added and online, the Ayla platform will push this Host OTA upgrade job at the runtime of those new devices. The number of times this system push occurs depends on whether you configured the recurrence for Continuous or One Time.
- User Consent - The end-user must approve the delivery of this ICC job when it is activated, or the job is not pushed to the devices. You may also leverage the Cloud APIs or Mobile SDKsSoftware Development Kits to obtain this user consent; click here to use either.
- For Job Metadata, click the Plus Sign icon (
 ), and then enter the key and value in the fields that display. If you wish to enter additional key-value pairs for this job, click the Plus Sign icon () to repeat this step. You may wish to add metadata to associate and categorize the job for your own internal needs, for example, adding a campaign ID or approval ID to the job for your internal tracking system.
Notice that you can click the Trash Can icon ( ) to delete your metadata entries.
- Click the CONTINUE button (shown below).

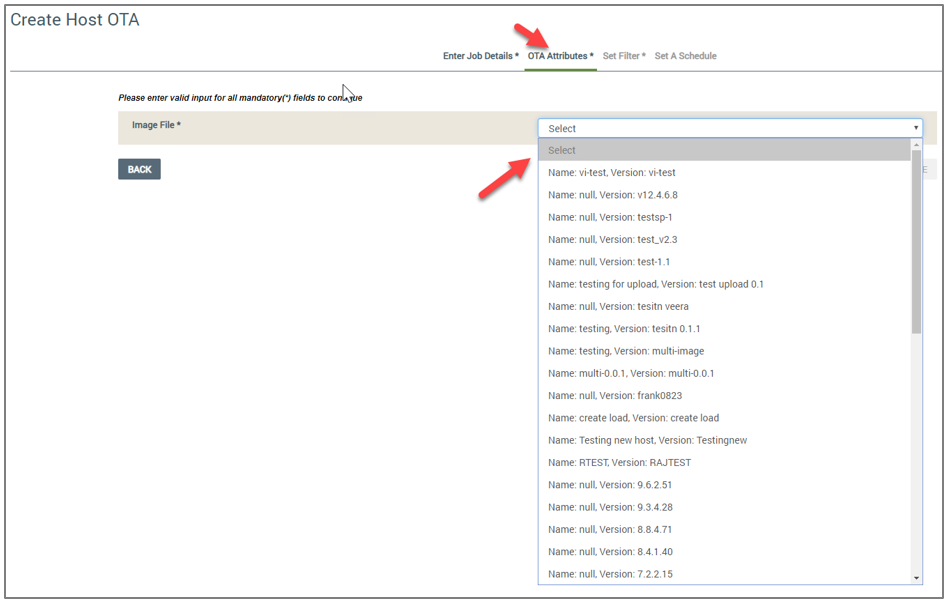
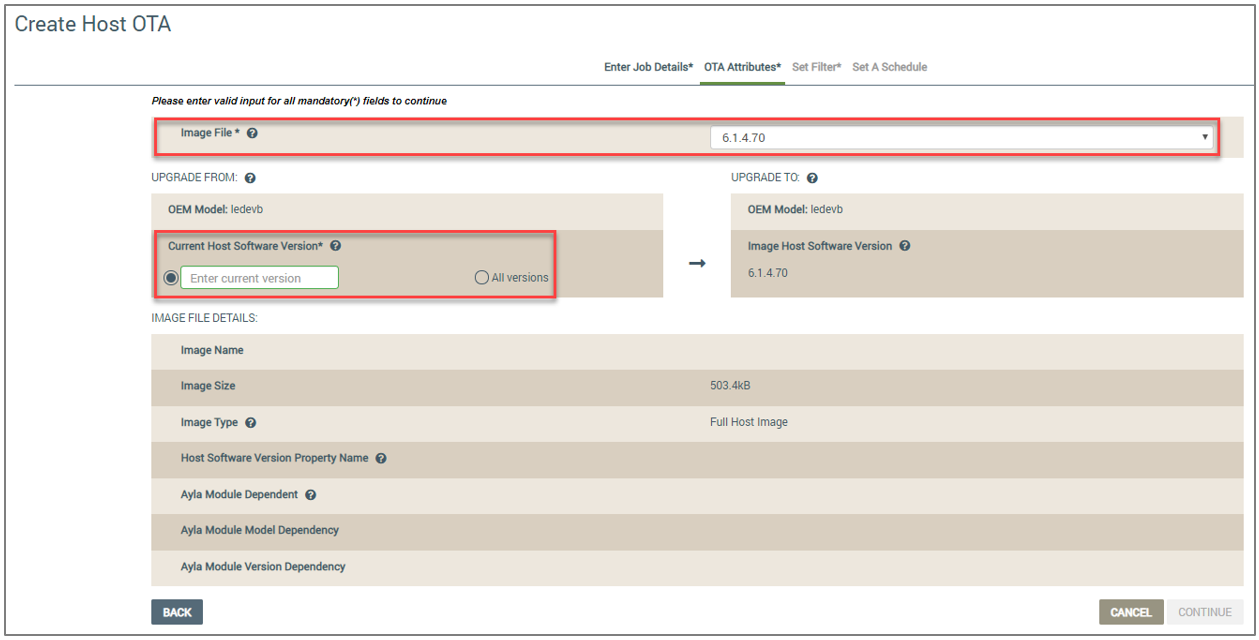
- On the next page, select the OTA image file of the host firmware that is going to be used to upgrade the target devices for this ICC job. Notice that this page is on the OTA Attributes tab. (Refer to the example below.) This list contains host firmware images that you uploaded; click here for the steps to do this if your image is not in the list.
Notice also that once you select the image file, the remaining fields display on the OTA Attributes tab, and the UPGRADE TO: section shows the software version of the image file you selected in this step and the OEM model of the target devices for this ICC job. Refer to the example below:
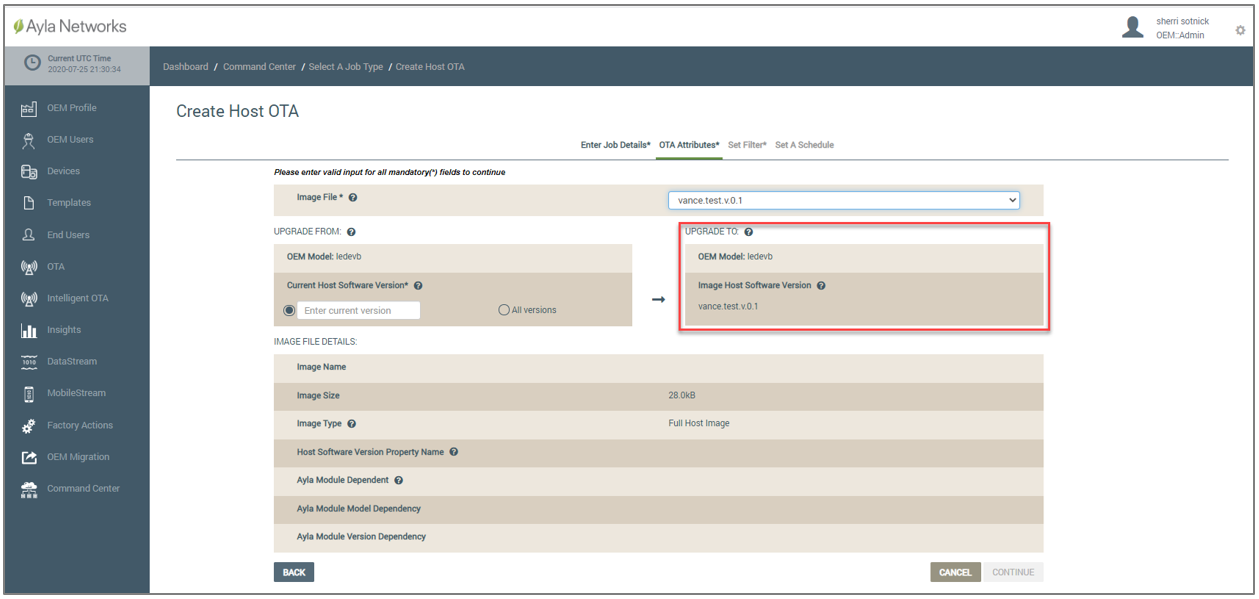
The lower section, IMAGE FILE DETAILS, provides information on the image file uploaded for this upgrade. The details in this section were entered when this firmware image was added to the Ayla Customer Dashboard. (Refer to Create New Host Images for a complete description of these details.)
- For Current Host Software Version in the UPGRADE FROM section, either enter the current software version of the host firmware on the target devices that will be upgraded or select All versions. Notice that these radio buttons and the Image File drop-down list are the only fields that can be edited on this tab. The latter gives you the opportunity to change the image file of the host firmware for this upgrade (which you selected in step i) before proceeding to the next step. (Refer to the example below.)
- Click the CONTINUE button to move to the Set Filter tab (example shown below).
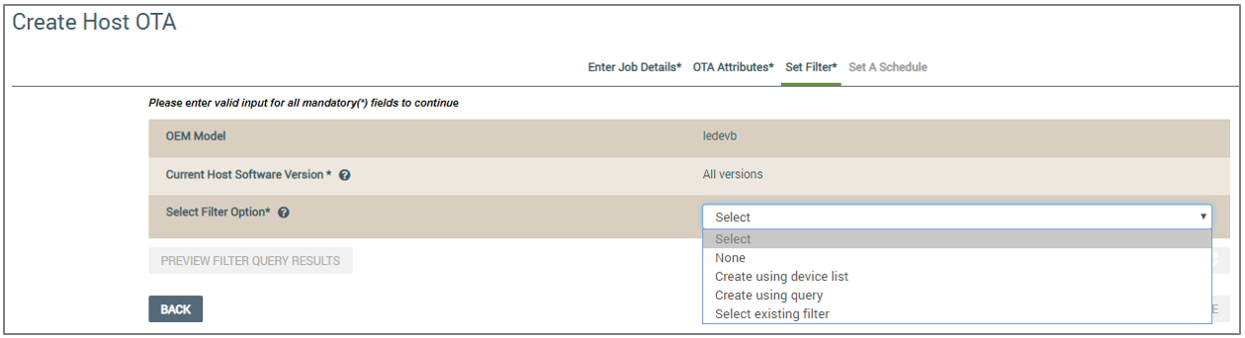
- For the Select Filter Option, select one of the following filters and enter the details required to specify the criteria for the list of devices to target: (Click each of the following filter options to expand its configuration steps.)
Use this filter option if you want to specify a static list of devices to target.
- For Filter Name, type a name for your set of targeted devices.
- For Enter DSNs, enter the Device Serial Numbers (DSNs) for devices you wish to target in this job. Use commas to separate the list of DSNs.

Use this filter option if you want to specify criteria that will dynamically create a list of devices to target. You can specify criteria across the device lifecycle status, versions, property values, and metadata.
- For Filter Name, type a name for your set of targeted devices.
- For Filter Category, select one of the options described below and enter the information requested in the fields for that filter category. Filter categories specify the criteria to use when the list of devices to target is dynamically created.
- Lifecycle/Status - These are device lifecycle events and connectivity status criteria. Enter the following information for this filter category (also refer to the example below):

- For Connection Status, select the connection status of the device when it is queried; the choices are as follows:
- Initializing - this is for devices that are attempting to establish a reliable connection with the Ayla Cloud. These devices may be able to receive commands, but may take longer to accomplish this.
- Offline - this is for devices that have not communicated with the Ayla Cloud recently.
- Online - this is for devices that are currently connected to the Ayla Cloud.
- For Time Since Activation, enter the amount of time that should pass after activating the target devices before running this ICC job. The time can be in days, months, etc. (e.g. 2D or 3M). This is useful if you want to avoid running jobs for end users that have just activated their devices to ensure a good initial user experience.
- For Connected At After, select a date to indicate the last time the target devices connected to the Ayla Cloud. This ICC job will only apply to devices that connected after this date.
- For Connected At Before, select a date to indicate the last time the target devices connected to the Ayla Cloud. This ICC job will only apply to devices that connected before this date.
- For Activated At After, select the date to indicate the first time the target devices were activated. This ICC job will only apply to devices that were activated after this date.
- For Activated At Before, select the date to indicate the first time the target devices were activated. This ICC job will only apply to devices that were activated before this date.
- Device Versions - This is used for hardware and software versions associated with the target devices, including OEM model, templates, and firmware. Enter the following information for this filter category (also refer to example below):

- For Ayla Module Model, select the specific model of a connectivity module that leverages the Ayla Production Agent. This is therefore only applicable for devices that use the Ayla Production Agent.
- For Ayla Module Version, select a specific firmware version for the Ayla Production Agent. This is therefore only applicable for devices that use the Ayla Production Agent.
- For Host Software Version, notice that displayed is the current software version of the host firmware from which you are upgrading. This is the Host Software Version that you selected on the OTA Attributes tab (step j above). You cannot edit this field.
- For Template ID, enter the ID of the Ayla template that is associated with the devices you wish to target for this ICC job.
- Property Value - This is used to filter target devices based on specific conditions for the device properties. Enter the following information for this filter category (also refer to the example below):

Notice that you can click the Plus Sign icon () to apply multiple properties to this filter. (The limit is ten.) You can also click the Trash Can icon () to delete a property entry.
- For Property, select the device property for the target devices.
- For Operator, select the appropriate operator for the property and its value.
- For Value, enter the value for the property.
- Device Metadata - This is used to filter target devices based on specific device metadata. You may choose this filter to associate and categorize the job for your own internal needs, for example, adding a campaign ID or approval ID to the job for your internal tracking system. Enter the following information for this filter category (also refer to the example below):

Notice that you can click the Plus Sign icon () to apply additional metadata to this filter. (The limit is ten.) You can also click the Trash Can icon () to delete metadata entries.
- For Key, enter the key for this device metadata.
- For Value, enter the value for this device metadata.
- For Additional DSNs to Include, enter a comma-separated list of device serial numbers (DSNs) for additional devices that do not meet the filter criteria that you configured, but you want those device included in this ICC job .
- For Specific DSNs to Exclude, enter a comma-separated list of device serial numbers (DSNs) that meet the filter criteria for this ICC job, but you do not want included in the list of target devices.
Use this filter option if you have already created a filter that you want to use. Notice that you are on the Set Filter tab. (Following is an example of this page.)
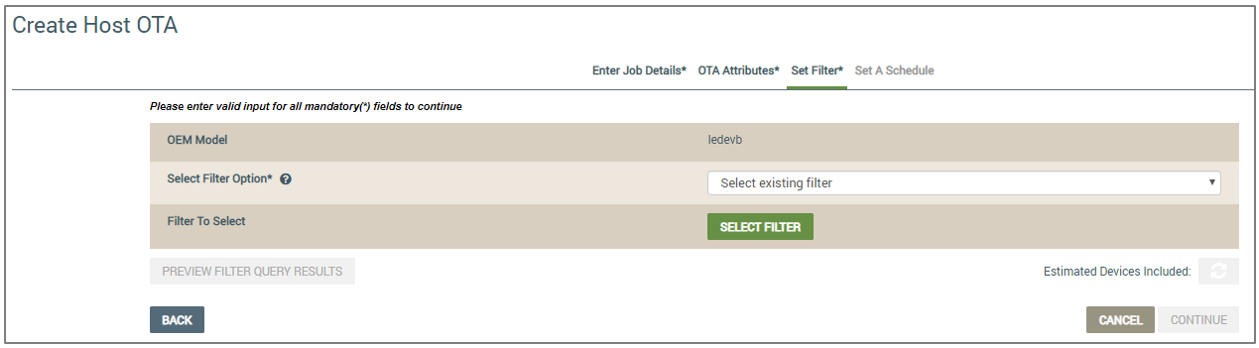
- After selecting the Select existing filter option, click the SELECT FILTER button to open the Select Filter dialog box (example shown below).
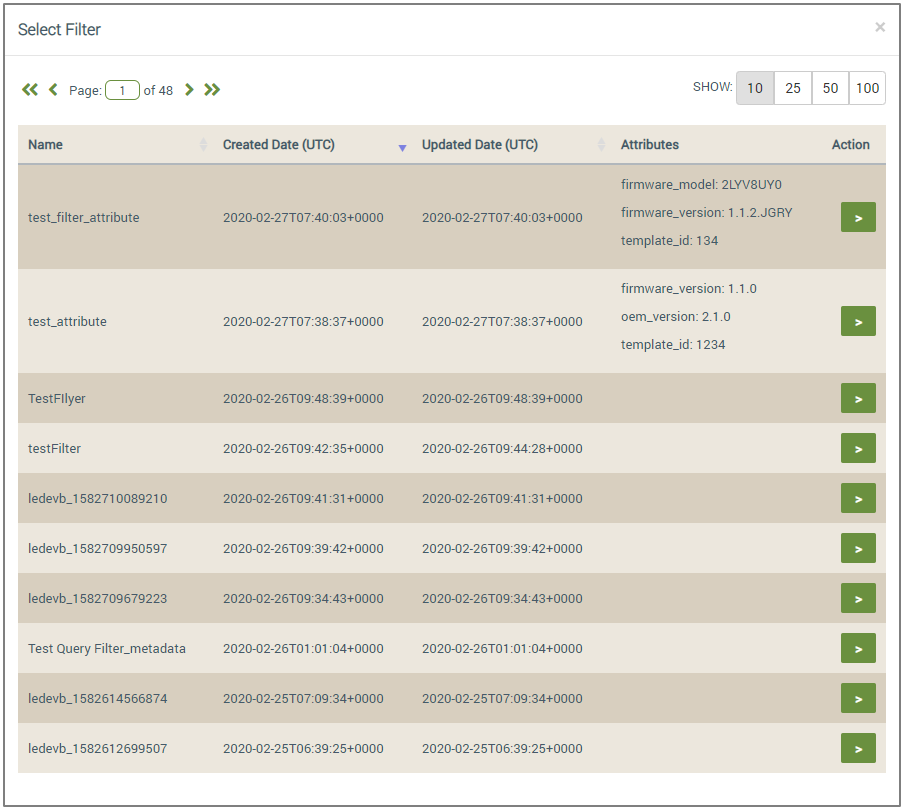
Notice that this dialog box provides the following information:
- Name - the filter you selected
- Created Date (UTC) - the date that the filter was created in the dashboard.
- Updated Date - the date that the filter was last edited.
- Attributes - the firmware version, OEM version, and/or Template ID specified when the filter was created.
- Click the button for the filter (
 ) that you want to use for this ICC job.
This opens the Set Filter tab again, which displays the filter you selected, as shown in the following example:

To change the filter you selected, click the Change Filter button, which takes you back to step 1 above so that you can select a different filter.
- After you select a filter and enter its criteria, click the Estimated Devices Included button to obtain the approximate number of devices that will be included in the filter results. Refer to the example below:

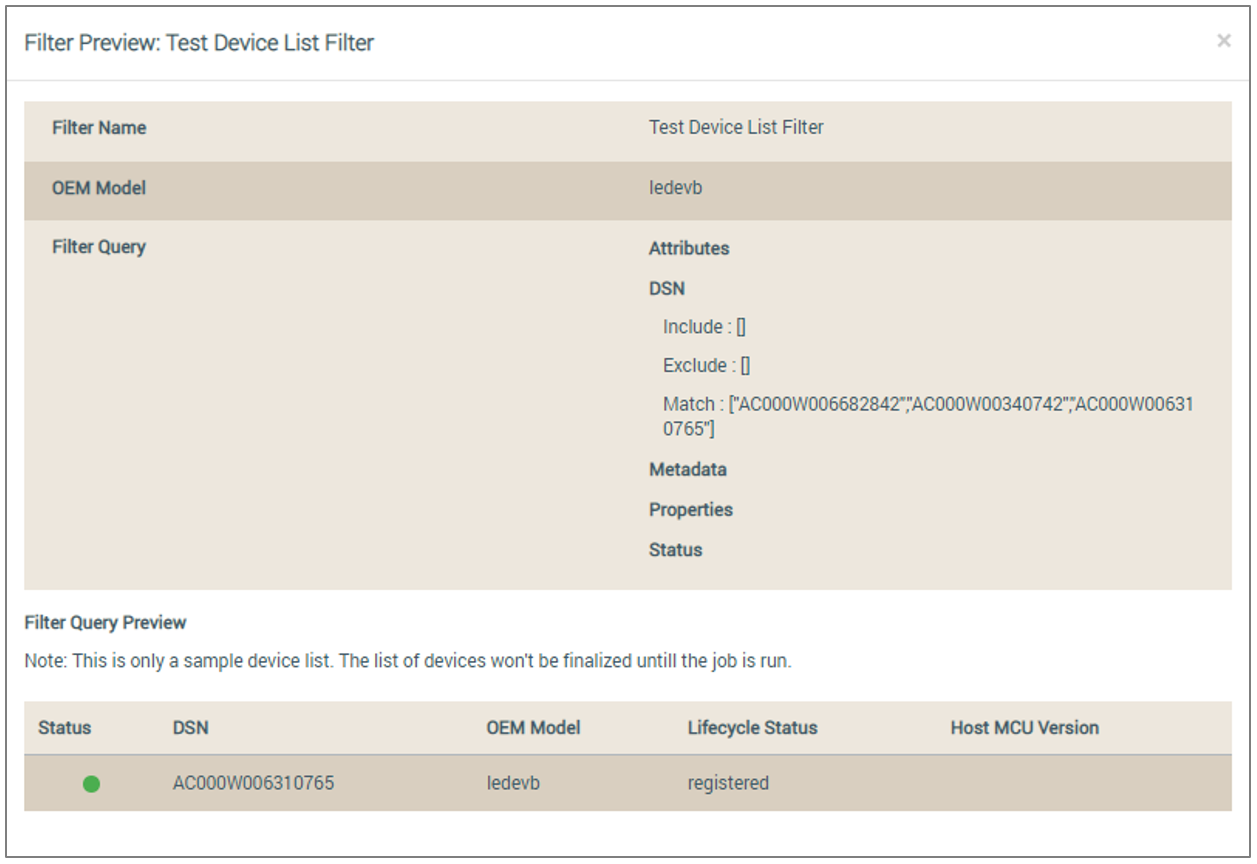
- click the PREVIEW FILTER QUERY RESULTS button (shown below) to compile a sample list of target devices for this ICC job.

Following is an example of the Test Preview window:
- After closing the Test Preview window, click the CONTINUE button to open the Set A Schedule tab. Notice at the top of the Create Host OTA page, two different messages display consecutively when this Host OTA ICC job is created and saved properly. Following are examples of the messages:


- For the Schedule Type field, select Recurring Schedule if you wish to set a schedule for this ICC job (example shown below).
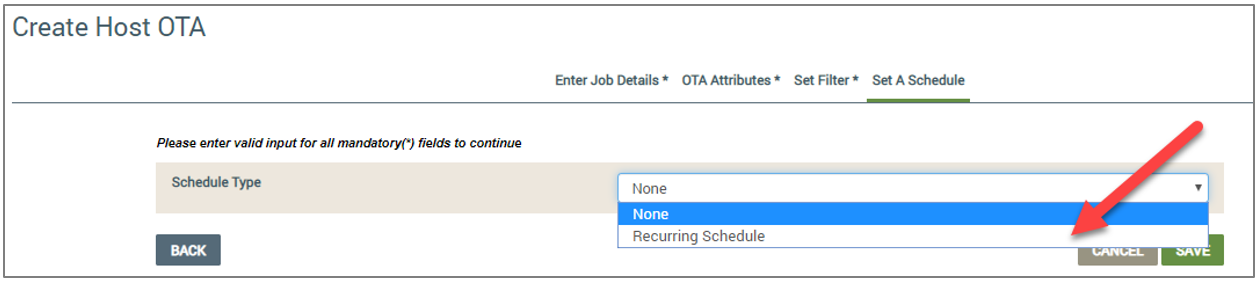
The Schedule feature eliminates the need for any user interaction once the OTA job is activated. There are two options for the Schedule Type field:
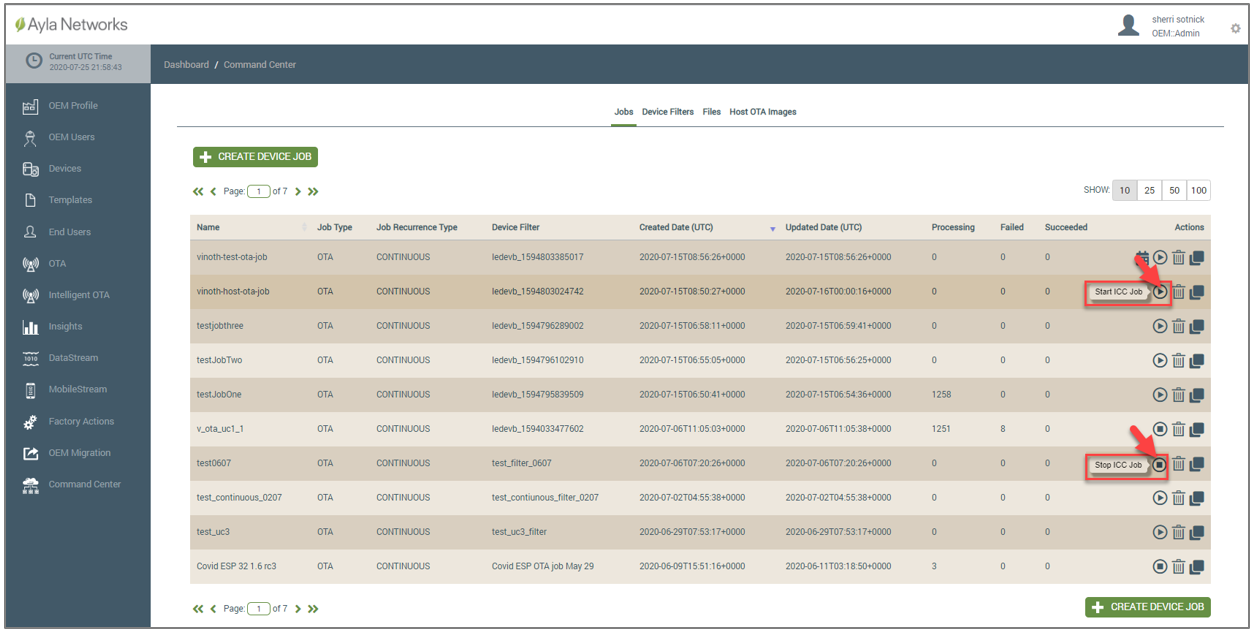
- None - the job runs upon activation without an associated schedule. In this case, you have to manually manage starting and stopping the job from the Jobs tab, as shown below:
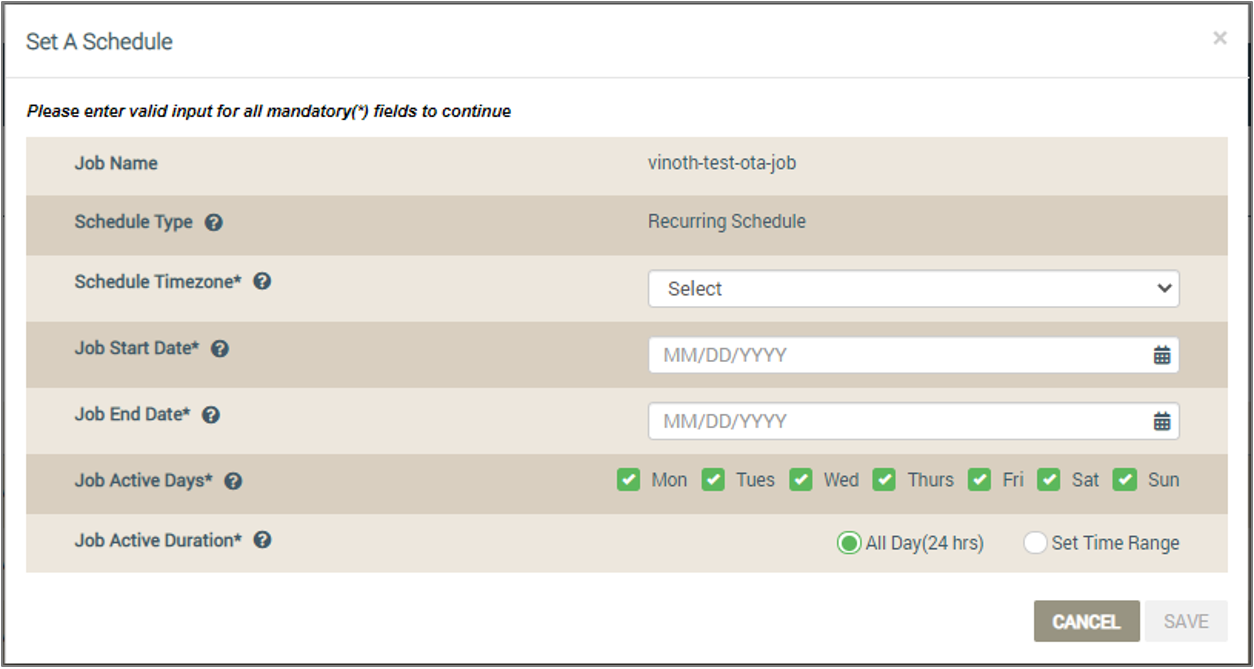
- Recurring Schedule - The job runs during the active dates, day, and execution time ranges specified in the schedule. When outside these time ranges, the job is paused. Following is an example of the settings required for the recurring schedule:

Configure a recurring schedule as follows:
- For Schedule Timezone, select the timezone for the scheduled parameters of this ICC job.
- For Job Start Date, select the date to specify when the job will start.
- For Job End Date, select the date to specify when to stop the job.
- For Job Active Days, click the check boxes for the days that this job should be activated.
- For Job Active Time, click either All Day (24 hrs) or Set Time Range to specify the duration that this job will run on the specified dates. If you click Set Time Range, complete the following fields:
- In From, select the time to start the job each day you specified in steps q - s above.
- In To, select the time to stop the job each day you specified in steps q - s above.
- Click the SAVE button. The following message displays at the top of the page when the schedule has been successfully saved for this ICC job.

Your new Host OTA ICC job is added to the Jobs tab.
If you did not configure a recurring schedule and wish to do this after you have already created your ICC job, click the Schedule icon on the Jobs tab (shown in the example below):
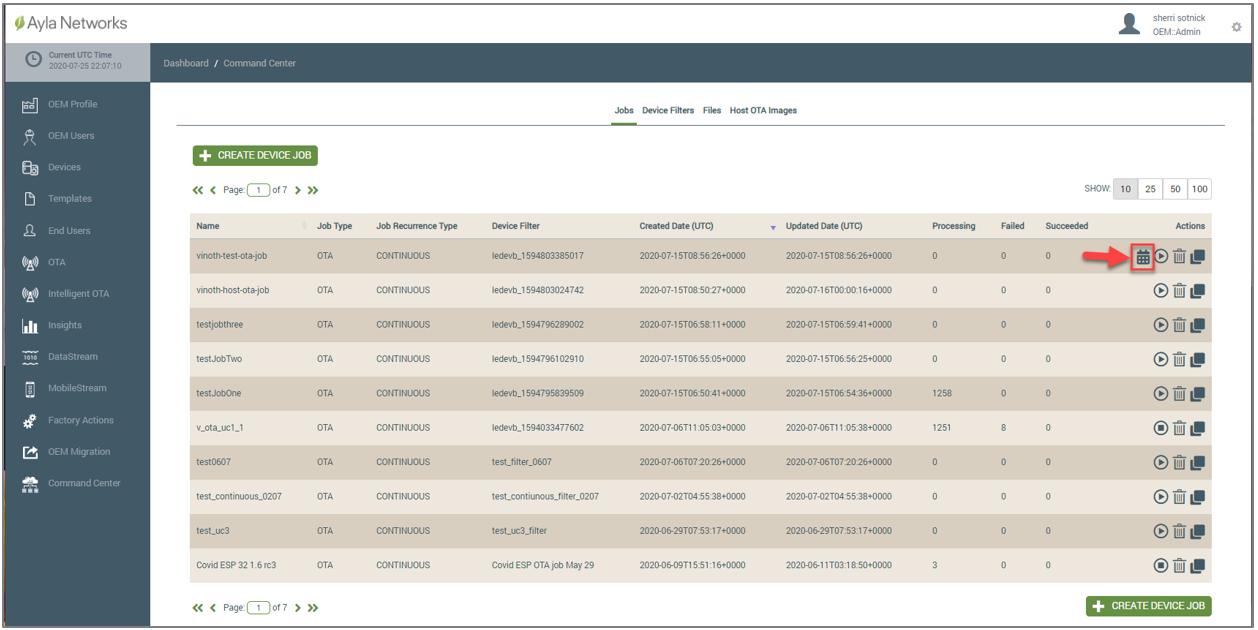
When you click the Schedule icon, the Set A Schedule dialog box opens (example shown below). Repeat steps p1-p5 and step q above.
See also: Ayla IoT Command Center, ICC: Device Filters tab, ICC: Files tab, ICC: Host OTA Images tab, Additional permissions OEM User Roles when creating OTA jobs, How to Create a Multi-Component OTA Job, How to Create a Continuous OTA Job
Please click here to let us know how we're doing. Thank you.